Printers & Supplies
Solutions & Services
Customer Support
Partners
Note:The CLEAN PRINT HEAD button performs two cleaning operations: wipe or purge. During a wipe operation, the printhead passes a wiper that removes paper fibers from the face of the printhead. During a purge operation, the printhead expels ink to flush air out of the ink-jet nozzles of the printhead. Whether the CLEAN PRINT HEAD button does a wipe or purge depends on the number of times you press the button and how many prints you have made before you press the button again. Press the CLEAN PRINT HEAD button one time. The printer performs a wipe operation that removes any paper fiber that might have accumulated on the printhead. When cleaning ends, the Ready message appears in the front panel. Press the TEST PRINT button to make a test print. If the print still has missing lines, press the CLEAN PRINT HEAD button again. The second time you press the CLEAN PRINT HEAD button, the printer purges ink. When the purging operation ends, the printer's front panel displays the Ready message. You can then make a print. If the print still has missing lines, press the CLEAN PRINT HEAD button again. When you press the CLEAN PRINT HEAD button for a third time, and you have made less than three prints since the last time you pressed the CLEAN PRINT HEAD button, the printer executes a longer purge. Note:When you make three or more prints between successive pressings of the CLEAN PRINT HEAD button, the cleaning cycle returns to the first stage and wipes the printhead the next time you press the button. If your prints still have missing lines (after pressing the CLEAN PRINT HEAD button three times), clean the wiper (see "Cleaning the head wiper"). If cleaning the wiper does not correct the printing problem, and if your altitude is 4500 feet (1500 meters) or more above sea level, change the Head Drive mode: With the printer on and the Ready message displayed in the front panel, press the UTILITIES button to access the Utilities mode. Press the TEST PRINT button (Next) to scroll to the Head Drive mode. You see this message: Head Drive: 1 Change Next Press the CLEAN PRINT HEAD (Change) button so that the message reads: Head Drive: 2 Change Next Press the TEST PRINT (Next) button several times to return to the Utilities mode. Press the CLEAN PRINT HEAD button (Exit) to exit the Utilities mode. The front panel displays the Ready message. After changing the Head Drive mode, press the CLEAN PRINT HEAD button to execute another purge; then make another test print by pressing the TEST PRINT button. If you still experience print quality problems, turn the printer off, wait at least 2 hours, then turn the printer on again. This "temperature cycle" cleaning may solve the problem. If print quality problems persist after the temperature cycle, call a service representative. You may have a malfunctioning ink-jet. Large spots or blobs of ink appear on the print. Spots that appear only on the back of the paper indicate a dirty drum. Spots on the image side or front of the paper indicate that the fuser wiper needs to be replaced. Refer to "Changing the fuser wiper" for details on replacing the fuser wiper.
Note:The CLEAN PRINT HEAD button performs two cleaning operations: wipe or purge. During a wipe operation, the printhead passes a wiper that removes paper fibers from the face of the printhead. During a purge operation, the printhead expels ink to flush air out of the ink-jet nozzles of the printhead. Whether the CLEAN PRINT HEAD button does a wipe or purge depends on the number of times you press the button and how many prints you have made before you press the button again.
The second time you press the CLEAN PRINT HEAD button, the printer purges ink. When the purging operation ends, the printer's front panel displays the Ready message. You can then make a print.
If the print still has missing lines, press the CLEAN PRINT HEAD button again. When you press the CLEAN PRINT HEAD button for a third time, and you have made less than three prints since the last time you pressed the CLEAN PRINT HEAD button, the printer executes a longer purge. Note:When you make three or more prints between successive pressings of the CLEAN PRINT HEAD button, the cleaning cycle returns to the first stage and wipes the printhead the next time you press the button. If your prints still have missing lines (after pressing the CLEAN PRINT HEAD button three times), clean the wiper (see "Cleaning the head wiper"). If cleaning the wiper does not correct the printing problem, and if your altitude is 4500 feet (1500 meters) or more above sea level, change the Head Drive mode: With the printer on and the Ready message displayed in the front panel, press the UTILITIES button to access the Utilities mode. Press the TEST PRINT button (Next) to scroll to the Head Drive mode. You see this message: Head Drive: 1 Change Next Press the CLEAN PRINT HEAD (Change) button so that the message reads: Head Drive: 2 Change Next Press the TEST PRINT (Next) button several times to return to the Utilities mode. Press the CLEAN PRINT HEAD button (Exit) to exit the Utilities mode. The front panel displays the Ready message. After changing the Head Drive mode, press the CLEAN PRINT HEAD button to execute another purge; then make another test print by pressing the TEST PRINT button.
Note:When you make three or more prints between successive pressings of the CLEAN PRINT HEAD button, the cleaning cycle returns to the first stage and wipes the printhead the next time you press the button.
   Head Drive:    1

   Change       Next
   Head Drive:    2

   Change       Next
Small spots of ink are randomly scattered across the page. Make a test print. If the spots are still present, change the fuser wiper (refer to "Changing the fuser wiper" for details).
Small or light ink specks appear anywhere on the edge. Clean the paper clamp. Refer to "Cleaning the paper tension blade, paper clamp, and drum" for details.
Frequent stray ink marks or gaps of ink appear on the prints. Select a different type of paper. Refer to "All about media" for details on what type of paper works best with the printer.
Stray ink marks or missing areas of the image. Try using a different type paper and change the fuser wiper. If the problem continues, clean the fuser roller. Refer to "Cleaning the fuser rollers" for details on cleaning the fuser roller.
Streaks appear on the paper. Clean the paper tension blade. Refer to "Cleaning the paper tension blade, paper clamp, and drum" for details.
A dark and heavy coat of ink appears that starts at either side of the page and runs toward the middle. Clean the printhead and use a different type of paper. Refer to "Print quality problems" for details on how the CLEAN PRINT HEAD button works.
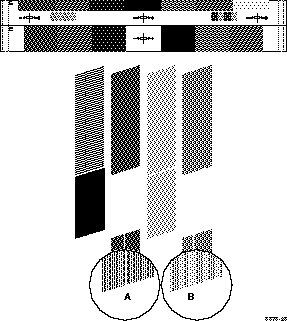
In vertical rows of dots, one row is offset from the others or missing. Make a test print (press the TEST PRINT button). If a row is offset, the ink from one of the ink jets is being deflected (A); if a row is missing, one of the ink jets is not functioning (B). Use the CLEAN PRINT HEAD button to clean the printhead; then make several test prints to help clean the paper path.
A vertical line appears to zigzag. If a vertical line does not appear straight, you may need to adjust the head convergence. Refer to "Setting head convergence" for details.
Missing ink. Clean the paper tension blade. Refer to "Cleaning the paper tension blade, paper clamp, and drum" for details.
Network problems The printer doesn't appear in the Chooser. The printer is turned on with the cables correctly attached. Check the termination (refer to the documentation for your Ethernet adapter or LocalTalk connector for information on termination). Select the correct zone in the Chooser before looking for the printer's name in the list of printers. If you have changed the printer's name, did you make it a unique name (not the same as any other printer in the zone)? Check the configuration page to get the zone name and printer name. Make sure that the appropriate network interface (LocalTalk or EtherTalk) has been selected for the Macintosh and that you are using the most current network software (available from Apple). Operation hints The paper skews as it passes through the paper path. Make sure that the paper is not excessively curled. You may have to clean the paper clamp. Refer to "Cleaning the paper tension blade, paper clamp, and drum" for details.
Frequent paper jams occur when you are using the paper tray. Load the paper properly into the paper tray. Use paper grades such as Book, Bond, or Text in the paper tray. Is the paper too thick or thin for the printer? Refer to "All about media" for more details on the type of paper you can use with the printer and for metric paper grade equivalents. Or you may need to clean the paper-pick rollers. Refer to "Cleaning the paper-pick rollers" for details on cleaning these rollers.
Printing on both sides of the paper. Use manual feed for the second side. The paper jams while you are using manual feed. Set the paper guides so that the paper travels squarely into the printer. Feed the paper into the printer and let the printer take the paper out of your hands. Wait at least 5 seconds before inserting a second sheet. Is the paper too thin or thick for manual feed? You pressed the TEST PRINT button and did not receive a test print. If the printer has been idle for more than 2 hours, you must press the TEST PRINT button again. See "Printer standby modes" for more information.
The print is wrinkled. You may be using paper that is too thin for the printer or have its grain running in the wrong direction. Use a different type of paper or position the paper correctly. Paper grades such as Bond, Book, and Text work best with the printer. Refer to the table "Guidelines for paper grade, weight, and thickness" for the metric paper grade equivalents.
When you requested Tabloid Extra media, the page doesn't print and you get a configuration error. You may have only 10-Mbytes of memory; in that case, the printer only accommodates paper up to B-size (Tabloid) or A3-size (Metric Tabloid). Delayed printout. See "Printer standby modes".
Turn off the startup page. Refer to the Phaser 300X Drivers and Utilities Printing Reference. Leave the printer on. The printer has an automatic standby mode that keeps the printer ready to use and reduces energy consumption. When you turn off the printer, then turn it on again, it consumes ink; so, leaving the printer on saves ink. However, if you will not be printing for two or more days, turn the printer off. After you turn on the printer, you should watch the first few messages that appear in the front panel. You may have to add ink or empty the waste bin before the printer continues the warm-up cycle. The edge of the printed paper is rippled. Load paper into the printer with the paper's grain parallel to the paper path (the direction the paper travels while it is fed through the printer). Refer to "All about media" for more details on paper grain.
Printer standby modes Idle for 2 hours. When the printer is idle for more than 2 hours, it goes into a standby mode that keeps the printer ready to use and reduces energy consumption. The printer exits standby mode when you send a file to the printer, press one of the front panel buttons, or open the rear cover. For example, adding ink or changing the fuser wiper causes the printer to exit standby mode. The printer does not purge ink when it exits standby mode after being idle for 2 hours. When the printer exits standby mode, it is ready to print in about 5 minutes. Idle for 2 days. When the printer is idle for 2 days or more, it cools down completely. When the printer exits the cool-down mode after being idle for 2 days, it purges ink as part of the warm-up cycle. The printer is ready to print in about 20 minutes. Printing and installation The image does not finish printing (the printer times out).
MODE LPT1:,,P > NULMODE COM1:9600,N,8,1,P
You have a Macintosh and the printed image has shifted or the margins are not correct. Refer to the topic "Printing from a Macintosh" for details on how to print from a Macintosh. You should install the Phaser 300X printer driver onto your Macintosh in order to select the correct page sizes from the driver. Refer to the Phaser 300X Drivers and Utilities Printing Reference for details on the Phaser 300X driver.
The image prints in black-and-white instead of color. If you have a Macintosh, use the Phaser 300X driver or the Apple LaserWriter printer driver (version 6.0 or higher) that supports color PostScript. Select Color/Grayscale in the print dialog box. Refer to "Printing from a Macintosh" for more details on how to print from a Macintosh. You may need to install specific application-related files such as PPDs, PDXs, and PDFs. Refer to the Phaser 300X Drivers and Utilities Printing Reference for information. Refer to the Phaser 300X Drivers and Utilities Printing Reference for information on the LaserWriter printer driver version 8.x. If you have a PC, be sure to use a driver that supports color PostScript. If you have Windows, use the Tektronix-supplied driver that was shipped with the printer's software. Refer to the Phaser 300X Drivers and Utilities Printing Reference for information on the drivers.
The Ready message is displayed in the front panel, but the file does not print. Try printing the same file to another PostScript printer. If the file prints, then the problem could be with the interface cable.
For the best results, use Tektronix interface cables, especially if you are using the serial port. Refer to the table "Phaser 300X interface cables and adapters" for a description of the Tektronix cables.
If the problem is not with the cable, refer to the Phaser 300X Drivers and Utilities Printing Reference for details on how to use the Tektronix Error Handler to determine the cause of the problem. The file does not print and a virtual memory (VM) error message appears on the Macintosh screen. You may need to expand printer memory. The file does not print or it prints garbage data. Make sure that you have selected the appropriate language (PostScript, HP-GL, or PCL5) for that file. Refer to "Switching printer languages".
You want to make the largest image possible on Tabloid Extra paper (305 x 457 mm or 12 x 18 in.). The printer should have at least 14 Mbytes of memory. Refer to "Margins and image area" and Advantages of adding memory.
You are using manual feed and part of the image does not print or the image orientation was not correct. You may have manually fed paper without having selected Manual Feed in the driver. Check the paper tray. The orientation (long side or short side of the paper enters the printer first) of manual feed must match the orientation of the paper tray. Select Manual Feed and the correct orientation from the printer driver. Change the direction of the manual feed, or change the direction of the paper in the paper tray. When using the paper tray, load the transparencies with the white strip (Tek® logo) and blue arrows entering the printer first. The image is clipped or rotated. Make sure that the paper is correctly installed in the paper tray. The rear guide in the paper tray must be positioned snugly against the paper. A clipped or rotated image can result if you have selected the wrong printer in the Chooser. Make sure that you choose the complete and exact name of your printer. Color corrections. Refer to the Phaser 300X Drivers and Utilities Printing Reference for details on how to select color corrections. Files sent to the printer during power-up do not print. Before printing a file, wait until the printer's front panel displays READY. Some applications, drivers, and spoolers report IDLE when the printer is ready to accept print jobs. The printer receives files but does not print (serial and parallel ports only). Do not set the wait timeout to 0. Also, print files should not have extra characters after the End-of-Job character (Ctrl-D). See the Phaser 300X Drivers and Utilities Printing Reference for information on setting timeouts and the Ctrl-D character. You send a file to the printer's serial or parallel port, and the printer's front panel displays WAITING FOR DATA indefinitely. Another file sent to a different port causes your computer or network interface to lock up. Do not set the wait timeout to 0. Also, print files should not have extra characters after the End-of-Job character (Ctrl-D). See the Phaser 300X Drivers and Utilities Printing Reference for information on setting timeouts and the Ctrl-D character. You send a file to the printer's serial or parallel port, and the job prints successfully. After the job prints, the printer displays WAITING FOR DATA, then goes into Standby mode after 2 hours. The printer doesn't come out of Standby mode for the next print job. To recover, press the TEST PRINT button or reset the printer. (If you reset the printer, you must send the print job again.) To prevent this condition, do not set the wait timeout to 0. Also, print files should not have extra characters after the End-of-File character (Ctrl-D). See the Phaser 300X Drivers and Utilities Printing Reference for information on setting timeouts and the Ctrl-D character. The startup page prints although you disabled it. The printer's power-up self-test can detect problems that do not necessarily make the printer completely inoperable. Examples of these non-fatal errors include faulty printer ports and some memory failures. If the printer detects a non-fatal error at power-up, the startup page prints, even if you have disabled it.